EM9
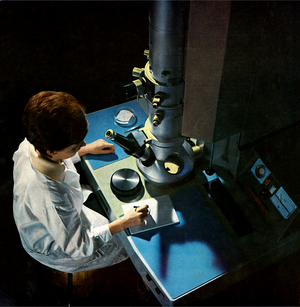
The EM9 was Carl Zeiss first Electromagnetic focusing TEM. It was later Succeeded by the EM10 series. Its design Philosophy was to create an affordable and easy to use Electron Microscope which can be operated by the average scientist with little problems. This came at the cost of the ultimate Resolution these machines could attain in routine Operation.
At the time of its creation, two general types of Operation Philosophy and Operator had started to become apparent to the Manufacturers. These are the High performance instruments, for which no expense and complexity was spared in the pursuit of resolution. This usually resulted in an instrument whose Operation required at the very least some knowledge of Physics, as well as being vigilant so as to not place the instrument into a state where it may suffer damage. Additionally, most things that could be adjusted within the microscope, where available for such, to the user. Some of these adjustments, such as Lens Alignment and Tilt correction tended to result in poorer ultimate resolution, if attempted by an unexperienced user, or done in haste. Thus the ultimate resolving power was down to user Knowledge, Experience and Skill.
The other type of Operation Philosophy and Operator was that observed in the creation of the EM9, this is the Scientist who uses the Electron Microscope merely as a tool to further his research. Thus operating the instrument was intentionally made simpler, blocking many delicate adjustments to the normal user, and generally ensuring a decent performance throughout its magnification range. Instruments of this type where also usually cheaper then the high performance units mentioned above, with the added benefit of having the user not having to worry as much about making a mistake when operating the instrument. This greatly Interesses, according to various sources (see promotional brochures under the section documentation), the efficient use of the microscope for routine tasks.
Their vacuum systems and safeguards are also designed so that not much user error can lead to damage to the microscope, though it is still possible to produce valve states which can and will damage the system. Examples of these are the venting of the Diffusion pump to air and or the Column.
Much like its predecessor, the EM8, this unit also features vacuum tube based circuitry as well as a High Frequency AC based High Voltage system. Also, much like its predecessor, the machine was designed to have minimal external components cluttering the lab in which it is set up. The only external component which is not the Microscope proper, is its Roughing Vacuum pumps.
Variants
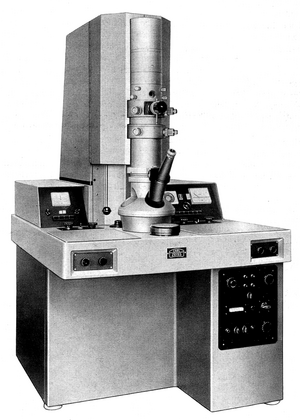
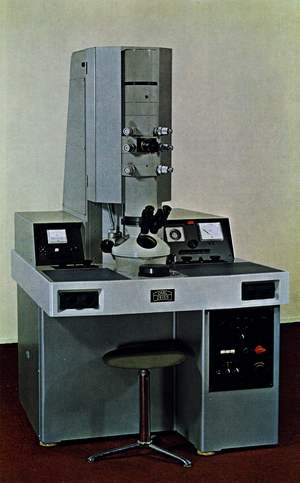
4 Variants of the EM9 are currently known to the author, these are the original EM9 as seen in the first image and promotional picture above. As well as the EM9A, EM9S and EM9S2. It is currently unknown what the differences between the EM9S and EM9S2 are. Furthermore based on the images provided, the EM9 and EM9S appear to be the same machine, but with a different name, what was changed between these 2 version is thus unkown.
EM9
This is the first generation of EM9, unlike later versions, it did not feature a condensor lens, instead opting for the use of direct illumination by the electron gun.
EM9A
This the second generation of the EM9, now featuring a 1 stage magnetic condensor lens.
EM9S
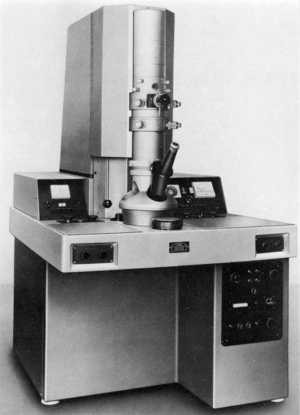
The EM9S appears, based on the image from Meeks book "Practical Electron Miroscopy for the Biologist, First Edition" to be externally nearly identical to the earlier EM9
EM9S2
The EM9S2 appears to be the successor of the EM9A, also featuring a single stage Condenser like that seen in the EM9A. Currently the technical differences between the EM9A and EM9S2 are unknown to the author.
Vacuum System
The Vacuum system of the EM9 series is fully automated, and is mostly protected against user operating error. Though one should take note not to change vacuum states while the servo motor controlling the Spool valve is Operation, as this may cause its fuse to trip.
Automation
The EM9 series uses an interesting design of vacuum automation in the form of a Servo Motor Controlled Spool / Pipe valve system. This Servomotor is controlled by means of micro switches and relays. Mode selection is performed by 3 buttons located to the lower right of the console, depressing one of these will trigger a Thyratron Valve (Model RS1), which then delivers power to a mode relay. This then actuates the Servo motor to move the valve spoon into the correct position, based on the measured vacuum.
Pumping Scheme
Pumping wise, the EM9 uses a simple low component count high vacuum system. This consists of a Leybold Oil Diffusion pump and a rotory vain Roughing pump. Valving is accomplished by means of a large Spool valve located above the Diffusion pump, which in tern is located immediately behind the Column Assembly. Additionally a solenoid Valve is used to connect the Exhaust of the Diffusion pump to the Roughing pump, when not evacuating the column, as well a second such valve being used to vent the column for maintenance.
Evacuation of the column is performed by first disconnecting the roughing pump from the diffusion pump exhaust, which simultaneously is isolated from the column by means of the spool valve. The column is then roughed to a pressure low enough for the diffusion pump to take over and evacuate it to a high vacuum. According to the manual, this should take 10 minutes or less, else the diffusion pumps oil my be compromised, as its vacuum is not being maintained by the roughing pump. According to a friend of the author, evacuating the column from ambient air pressure to a roughing vacuum can take up to 2 hours, though the author has not experimentally verified this. In the case this is correct, evacuating the column from Atmospheric pressure to a rough vacuum, would require the user to unplug the diffusion pump before it is allowed to heat up, else the pumping fluid may be ruind.
One interesting note on the vacuum systems design, is the means by which the specimen is placed into the high vacuum of the column. Unlike many newer models, such as the EM10 series, the airlock dose not feature a roughing scheme, but instead traps a volume of 1cm³ around the tip of the specimen exchange rod, which is then vented into the high vacuum of the column. This spike in pressure is then dealt with by the diffusion pump, and a high vacuum is then restored.
This also necessitates that the user shut off the Accelerating voltage and Filament prior to sample exchange. A automated system is present to prevent the user from introducing the large gas load with the filament and high voltage active, but this system is not fool proof, thus it is advisable to manually shut these off prior to specemin exchange.
Vacuum Gauges
The EM9 series features a very simplistic means of vacuum gauging, only featuring a pirani gauge head at the roughing pump line. For safeguarding of the diffusion pump, a membrane vacuum switch is used to prevent the diffusion pumps heating without propper roughing vacuum.
It is interesting to note, that the Pirani Gauge is only Operation when the microscopes automatic vacuum system is set to mode 1 or 2, in the standby / off state of 0, the gauge amplifiers are switched off, and the galvanometer dose not indicate the present vacuum.
Sealing Scheme
Sealing in the EM9 series is heavily reliant on Rod Seals, thus allowing the movement of the spool valve spool as well as connecting pipes to the column. The column proper uses mostly O-Rings for sealing, and dose not feature clamping mechanism to apply pressure to the seals, instead relying on the pressure difference between the columns interior and exterior for the force needed to seal the o-rings. Initial sealing force is applied by the mass of the column segments alone, thus it is possible to lift these segments without undoing any bolts when the column is at atmospheric pressure.
Documentation


